A few nights ago, I learnt that my Mac closed the CD after one single burn, i.e. no other files could be copied to the CD even if there was sufficient space. So I asked around and more than one person said "Get Roxio Toast". Problem was that particular software costs over USD$180. By chance, another Mac user whom I met online pointed me to this set of instructions over at Apple.com, which led me to this documentation:
- In Disk Utility, create a disk image that contains the files you want to burn to the disc.
- The files must be from a volume with a Mac OS Extended disk format. To check a volume's disk format, select the disk in Disk Utility and look at the information at the bottom of the Disk Utility window.
- Select the disk image in the Disk Utility list and choose Images > Burn.
- Select the "Leave disc appendable" checkbox. If you don't see this option, click the triangle in the top-right corner.
- Insert a blank recordable disc in the optical drive, and click Burn.
To a Mac newbie like me, the actual steps were not as straight-forward as the 5 steps listed at the Apple website. I decided it would be more efficient in the longer run if I took my own notes as reference. And since taking screenshots on the Mac was a breeze, I did so and had my own step-by-step guide.
In googling for "multisession burning disk utility", I found only this set of instructions with screenshots on using Disk Utility for Tiger OS X, by Ken Stone. In the spirit of sharing, here's my very small contribution to the Mac community:
How to do multisession burns on Mac OS X
[click on image to see larger picture]
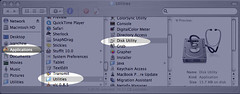
1) Find and start the Disk Utility application. Look in the "Applications" -> Utilities folder
2) Create a new Image: File -> New -> Disk Image from Folder
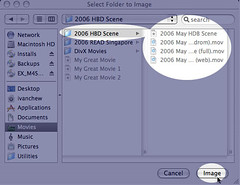
3) Select the folder with the files to be copied, then click on the "Image" button. NOTE: Only folders can be copied, not individual files. Each time you want to copy the file, you might want to create a new folder and place the file in that folder.
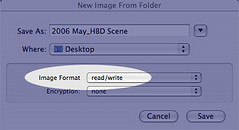
4) IMPORTANT STEP: Select "read/ write" for Image Format (if not, the CD or DVD will be closed). Click on "Save".
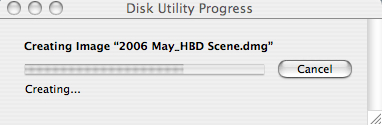
5) Wait while the Image (.dmg file) is being created.
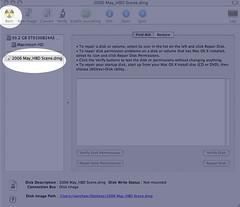
6) Once the image is created, you'll see this screen. Select the image from the Disk Utility window and click the "Burn" icon.
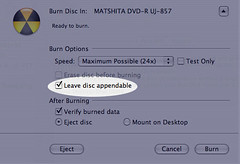
7) Insert the CD/ DVD. If this is a brand new disk, you will see this dialog box. IMPORTANT - select "Leave disc appendable" if you want multisession burning later on. Then click "Burn".
8) Wait while the files are being copied to the CD/ DVD.
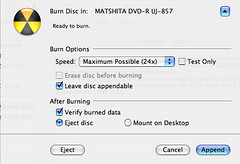
9) Follow steps 1 to 8 the next time you want to copy to the disk. When you reach step 7 and insert the previously recorded disk, you will see this dialog box. The difference is that now you see the "Append" button instead of "Burn". IMPORTANT -- Remember to select "Leave disc appendable" before clicking Append.

Hope this helps. May it save another Mac newbie the time it took for me to figure this out.

Nicely done... see a need and fill it. That's a great way to help build a more meaningful internet. :)
ReplyDeletebeen over a year since i burnt a cdrom ...
ReplyDeletep.s. nice use of highlighting in the illustrations :)
I completely agree that Apple's simple directions don't quite tell all. Thanks for adding the screen captures; they make it all much clearer.
ReplyDeleteThanks a lot, It was very useful for me :)
ReplyDeleteCGY. 9/2/2007 Sounds great, but how can I do this with a Microsoft Word .doc or .rtf file, when the image changes the file extension to .dmg, applicable only to Mac ??
ReplyDeleteSorry, CGY. My knowledge is limited to just what I've posted.
ReplyDelete